How To Get MailChimp Automation Right For Effective Email Marketing
What Is It All About?
Automated emails deliver information to your patrons right when they need it, in a way that’s efficient for you and your team. You can send a series of emails to introduce your new patrons to your venue/festival, share show/product recommendations based on what your customers have purchased in the past, and more.
With MailChimp’s automation workflows, you can easily create and track trigger-based emails that are automatically sent to your patrons. Workflows are available in all paid MailChimp accounts. You can upgrade your account to a monthly or pay as you go plan in your Mailchimp account settings.
The Basics
Workflows use triggers to send an email or a series of emails to specific patrons on a list. A trigger can be an open or click in one of your campaigns, a ticket purchase, or an action that's combined with one of MailChimp’s other features. MailChimp have created a series of workflows with pre-built triggers to help you get started. If those don’t fit your needs, you can also create a custom workflow of your own.
How Automated Emails Work
MailChimp workflows operate on conditional logic: if A happens, then B will happen. This means that when you're setting up your workflow, you're creating specific conditions for emails to send. There are lots of triggers you can choose from to create the conditions for your emails. Activity-based workflows are triggered by the actions of a patron. The send time of each email will depend on the send time of the previous email in the series. For example, if a trigger is set to send a welcome email 1 day after someone purchases a ticket, then a follow-up email a week after they purchase, you would set the follow-up email to go out 6 days after your first email, or 1 week after your patron purchased a ticket. If you pause a single email in a workflow, your patrons will queue up for the paused email until it's turned back on.
Subscribers who are beyond that point in the timeline will continue to receive the remaining, active emails as planned. Date-based workflows calculate when to send emails based on the distance from a specific date (or trigger)—not the actions of the subscriber. For example, if you sent 2 emails to a subscriber, one a week before their birthday and another one day before their birthday, you would set the first email to send seven days before the absolute date and the second email to send one day before.
If you pause your date-based workflow, subscribers won't wait in the queue for next email, because there is a specific date on which they need to get the email. If the workflow or email is inactive at the time a subscriber is scheduled to receive something, the email won't go out at that time, and the subscriber moves into the next queue in the workflow.
When To Use An Automation
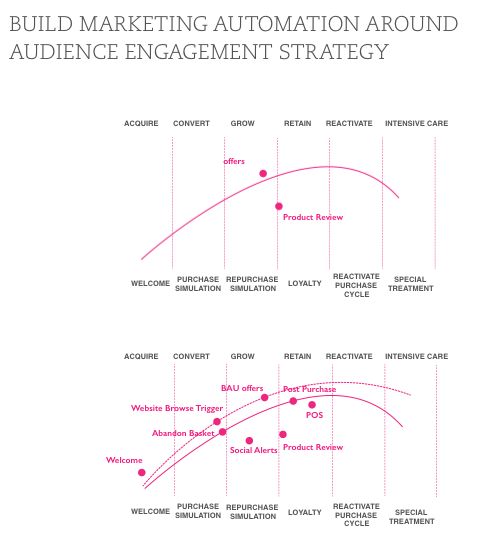
An automation workflow is great when you have content you want to automatically deliver to your subscribers at a specific time. Here are the common scenarios available in our pre-built workflows:
When a subscriber signs up for your list: Welcome new subscribers with a single email—or a series—to help them get to know your organisation. Tell them what they can expect in future newsletters, send a special ticket offer, or give them tips on how they can take advantage of everything you have programmed this season.
When you have a series of emails: Maybe you have educational content, like a workshop, that needs to be sent out on a regular basis over a period of time. Break that information into a series of steps that can be sent over days, weeks, or months.
When you need to send an email once a year: This might be for a patrons anniversary. Set the workflow to send annually, and we'll take care of the rest. Following up on website activity: When a subscriber navigates to a specific link on your site from a newsletter, automatically send them follow-up information using Goal. Help them make a purchase decision, or send a survey about their experience on your website.
When you want to thank your best patrons: The patrons who purchase from you on a regular basis are important to your business, so let them know. Send a simple thank you, invite them to a special VIP membership program, or offer a discount.
Follow up after a purchase: Send additional product recommendations or product care tips based on what your customers have purchased.
When you want to get feedback: Use a survey to make your patrons feel valued and get important feedback about their shopping experience online and through your box office.
When you want to create a win-back campaign: Develop a series of win-back emails to encourage inactive patrons to re-engage, and utilise post-sending actions to automatically perform a specific list action on patrons after they receive the final email in the series. This could be used to update one of their merge fields, move those subscribers to a different interest group, or to remove them from your list completely.

When Not To Use Automation
The possibilities of automation seem endless, but there are some scenarios where using this feature doesn’t make sense. You want to make your patrons feel special, not like they’re interacting with a robot.
When you want to send a personalised note: Personalisation can only go so far with automation. It's hard to sound human when you're delivering pre-written copy that sometimes goes to many other patrons. To send a truly personal note to a small group of your loyal patrons, it’s best to write something fresh every time, a patron who bought over 10 tickets last year might be deserving of a be-spoke mail.
When there's more content than you can manage: When setting up automation, keep in mind the potential time commitment. The more custom and targeted your messaging gets, the longer it will take you and your team to set up, test, and create new content. A few basic workflows can still be powerful—and manageable for a team to execute and maintain.
When you need to send transactional email: A transactional email contains one-to-one content tailored specifically to an individual user, like a Facebook notification or a password reset. While workflows can handle one-to-one marketing emails, such as a welcome message to a new patrons, they're not designed to handle large volumes of transactional email.
Before You Start
Whether you create a custom workflow or use one of MailChimp’s pre-built options, there are a few steps you’ll need to think through before building your first automation workflow.
When should emails be sent?
You can decide the timeframe and what days of the week you want the email to go out. Immediately after the triggering action? The next day? The next week? It's your call, we have some recommendations depending on the workflow automation you want to engage in.
For workflows with multiple emails, you’ll also decide how much time should pass between each new message being sent. If you’re not sure about how to pace your content, set up a test workflow with the delays you’re considering, then send that workflow to yourself. Or take a look at your own inbox: are there companies sending to you too frequently? Consider spacing your own emails further apart. You can decide which days of the week to send both custom and pre-built workflow emails. If you have content that is likely to get missed over the weekend, don’t schedule an email for delivery on Saturdays or Sundays. The time delays you’ve built between emails will take the days you exclude into account. So, if your series has a 3-day delay between emails and one message sends on a Friday, exclude Saturdays and Sundays so the workflow will start its 3-day delay on Monday. If you want a message to go out on an annual date, you'll want to have the option to send any day of the week.
What is the trigger?
The trigger is an action your patron takes that signals to your workflow to start sending. For example, if you want to send a follow-up email to every patron that clicked a link in your last show list campaign, that click would be your trigger. Inactions can also trigger. Maybe the patron opened a campaign, but didn't click anything—that can be set as a triggering event, too. MailChimp's pre-built workflows have triggers defined for you—you’ll just need to input values for the trigger criteria. Custom workflows require you to define the trigger.
Will the workflow be tied to a regular campaign?
If so, you’ll need that campaign to be set up and ready to go. Then, you can tie patron actions in that campaign to your workflow triggers.

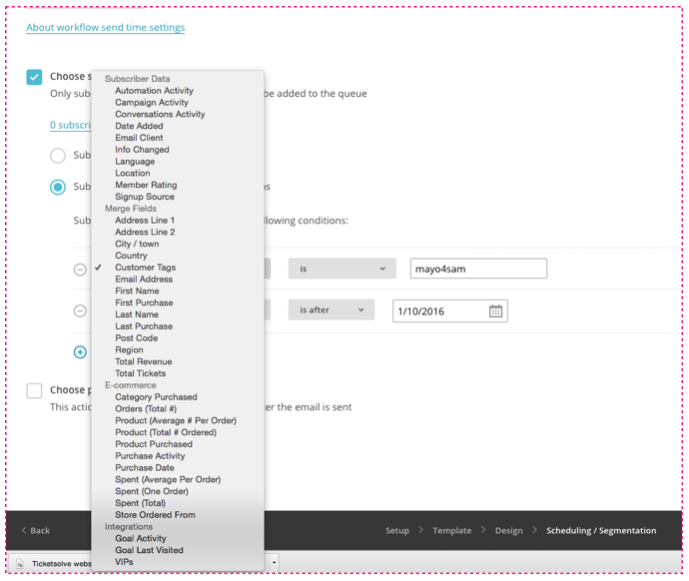
Who will get the emails?
Within MailChimp we can set our automation based on a number of criteria, examples of which are listed below:
- First Purchase - Unique email to first purchasers
- Last Purchase - Unique mail to customers who haven't purchased for 2/3 yrs
- Customer with Tag - VIP customers receive a tailored mail.


What will happen after an automation email is sent?
On the Scheduling/Segmentation step of each automation email that you create, you’ll have the option to choose a post-sending list action. Automatically update a merge field, add or remove subscribers from an interest group or static segment, and unsubscribe or delete a subscriber from your list altogether after an email is sent. This can, for example, help you encourage past customers to re-engage with your email and makes it easy to remove them from your list entirely if they remain inactive.
Workflow Options
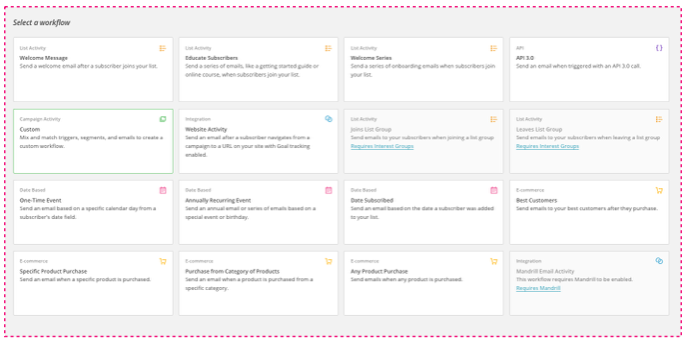
There are several preset workflow options to choose from: List activity workflows send when a subscriber joins a list in your account, opens a campaign, or clicks a link within a campaign. Workflows may also be triggered based on the date a subscriber is added to a list, or when they join or leave a group.
- API workflows send using an API 3.0 endpoint.
- Campaign Activity workflows can be completely customised and send based on a combination of triggers if the preset options don't offer exactly what you're looking for.
- Date Based workflows send based on a date, such as an anniversary of a patron.

E-commerce workflows are sent when a subscriber makes a purchase of a ticket/product from your website. These workflows require eCommerce360, for us to really understand the ROI of each campaign.
Welcome Series sends a series of emails to subscribers as they sign up or are added to a list in your account. Use this to easily create a series of emails welcoming subscribers to your list or to provide on-boarding information to your subscribers, and to provide additional information about your company or inform them of coupons, sales, or other events. When you select this workflow, you will have the option to add 1 or 5 emails to your workflow. You can then add or remove emails as needed.
Educate Subscribers sends a series of informational emails to subscribers as they sign up or are added to a list in your account. For example, you can send new customers “getting started” guides or links to online courses.
Date Subscribed sends a series of emails to subscribers based on the date that they signed up or were added to a list in your account.
Joins List Group is used to send to subscribers as they join one of the groups in your list. The Send Immediately option will send to everyone currently in the group.
Leaves List Group is used to send to subscribers when they leave one of the groups in your list. The Send Immediately option will send to everyone on your list who is not in the group.
API Workflows
If you're using API 3.0 to integrate your application with MailChimp, the API 3.0 workflow type will allow you to trigger a series of emails via the API. After you create the email series—in the MailChimp app directly or through the API—a list subscriber can be added to the workflow with a call to a provided URL.
Typically, emails in a series are triggered by delay settings based on when a specific subscriber is sent, opens, or clicks in the previous Automation email. These delay settings support API requests as well, so you can trigger an Automation email to a single subscriber based on any custom criteria through the API.
Campaign Activity Workflows
If none of our workflow options quite fit your needs, consider customising a workflow to help you target subscribers. Customised workflows allow you to create automation emails based a combination of different sending triggers and segments that you select. For example, you can send a series of emails to subscribers when a data value changes, such as a change of address or a name. Keep in mind that depending on your use-case, certain list fields, eCommerce360 data, Goal integration, campaign reporting data, or a Mandrill account may be required.

For workflows with signup-based triggers, check "trigger workflow" when subscribers are imported to include subscribers in the queue who you imported via a list import. This includes importing from a CSV file or from Excel, and any option on your account's Import subscribers page, with the exception of Import Mac Contacts. Integrations from our Integrations Directory use the API and would trigger an automation with or without the Trigger workflow when subscribers are imported option being checked.
Goal Workflows
Website Activity workflows send to subscribers based on when they complete a specific triggering action, such as visiting a page on your website, to encourage a purchase or other action. Keep in mind that workflows based on goal triggers require that the goal integration is enabled in your MailChimp account and that you place the goal tracking snippet in your website's code.
E-commerce Workflows
E-commerce workflows are based on subscribers' buying behaviour and require that eCommerce360 be set up to allow for e-commerce tracking in your campaigns. The first email can send immediately. However, the minimum time between emails is one hour. Keep in mind that on the emails step, you will need to set specifications for the e-commerce trigger, by defining the product or category that your workflow is associated with, for example. Best customers sends to subscribers based on parameters you set, such as purchase history, the amount spent in a single order, or the amount spent over time. For example, you can send a discount to a patron after they make purchases that add up to a specific amount. Specific product purchase sends to subscribers who have purchased a specific product. For example, you can send a series of emails to users after they've purchased a specific ticket to get feedback on their satisfaction with the product.
Are You Targeting The Right Patrons?
A patron may like getting occasional updates about your list of shows etc, but not want weekly reminders about shows. Consider creating groups based on the interests of your patrons and purchasing habits, jazz, drama, kids shows etc—or the frequency at which they'd like to receive your email—and developing workflows that are specifically tailored towards the patron. Most importantly, do your messages sound human? The key to a good automated workflow is making sure the content doesn't sound automated.

Categories
Recent posts
Archive
- January 2026 (1)
- December 2025 (2)
- November 2025 (1)
- October 2025 (3)
- September 2025 (1)
- August 2025 (3)
- July 2025 (3)
- June 2025 (3)
- May 2025 (4)
- April 2025 (5)
- March 2025 (5)
- February 2025 (4)
- January 2025 (4)
- December 2024 (3)
- November 2024 (5)
- October 2024 (4)
- September 2024 (7)
- August 2024 (5)
- July 2024 (3)
- June 2024 (3)
- May 2024 (3)
- April 2024 (3)
- March 2024 (4)
- February 2024 (5)
- January 2024 (3)
- December 2023 (3)
- November 2023 (4)
- October 2023 (4)
- September 2023 (5)
- August 2023 (3)
- July 2023 (4)
- June 2023 (4)
- May 2023 (5)
- April 2023 (4)
- March 2023 (4)
- February 2023 (5)
- January 2023 (4)
- December 2022 (4)
- November 2022 (3)
- October 2022 (4)
- September 2022 (5)
- August 2022 (2)
- July 2022 (4)
- June 2022 (5)
- May 2022 (4)
- April 2022 (5)
- March 2022 (3)
- February 2022 (4)
- January 2022 (4)
- December 2021 (2)
- November 2021 (3)
- October 2021 (5)
- September 2021 (4)
- August 2021 (4)
- July 2021 (3)
- June 2021 (4)
- May 2021 (2)
- April 2021 (4)
- March 2021 (5)
- February 2021 (4)
- January 2021 (5)
- December 2020 (4)
- November 2020 (4)
- October 2020 (5)
- September 2020 (5)
- August 2020 (4)
- July 2020 (7)
- June 2020 (5)
- May 2020 (5)
- April 2020 (5)
- March 2020 (8)
- February 2020 (4)
- January 2020 (5)
- December 2019 (3)
- November 2019 (5)
- October 2019 (4)
- September 2019 (4)
- August 2019 (5)
- July 2019 (4)
- June 2019 (4)
- May 2019 (5)
- April 2019 (4)
- March 2019 (4)
- February 2019 (3)
- January 2019 (5)
- December 2018 (4)
- November 2018 (8)
- October 2018 (2)
- September 2018 (3)
- August 2018 (5)
- July 2018 (4)
- June 2018 (4)
- May 2018 (1)
- April 2018 (1)
- March 2018 (3)
- February 2018 (2)
- December 2017 (2)
- November 2017 (3)
- October 2017 (4)
- September 2017 (2)
- August 2017 (1)
- July 2017 (5)
- June 2017 (3)
- May 2017 (2)
- April 2017 (3)
- March 2017 (2)
- February 2017 (3)
- January 2017 (3)
- December 2016 (4)
- November 2016 (1)
- September 2016 (1)
- July 2016 (3)
- June 2016 (1)
- May 2016 (2)
- April 2016 (2)
- February 2016 (1)
- January 2016 (3)
- December 2015 (2)
- September 2015 (1)
- August 2015 (2)
- July 2015 (1)
- June 2015 (2)
- May 2015 (2)
- April 2015 (5)
- March 2015 (2)
- February 2015 (2)
- January 2015 (4)
- December 2014 (3)
- November 2014 (3)
- October 2014 (2)
- September 2014 (3)
- August 2014 (3)
- July 2014 (3)
- June 2014 (7)
- May 2014 (6)
- April 2014 (3)
- March 2014 (2)
- February 2014 (1)
- January 2014 (3)
- December 2013 (1)
- August 2013 (1)
- June 2013 (1)
- April 2013 (1)
Sign up for regular updates


